Prozac
2.5
By Echo Loft Forumer Fishball79
|
Introduction
(Or I shouldn't have invited him over)
|
||
 |
A friend came by my place one weekend and brought along his CDs. We listened to them and he was visibly impressed by what he heard. He approached me next week for some advice on upgrading his own stereo as he feels it is not giving him what he wants.
I was there with
him when he purchased his first stereo, a pair of Mirage FRX-3 and a
Rotel RA971 integrated amp. It was a coincidence that he was later given
a Rotel CD player, matching his amp. It gave him the sound he wanted
within his tight budget. Uncoloured with sufficient midbass. This really
goes well with his kind of music which was japanese rock, rock and more
rock. |
|
|
|
||
|
Which
Speaker?
|
||
|
He was a student and had a limited budget of around $1000. Since that kind of money can only get him some floor stander that might not even sound any much better than his current pair save for lower bass extension, I suggested to him to DIY something. Having seen/heard some and read many success stories, I thought it was not difficult to make loudspeakers. Moreover, we were not setting out to create a new design, merely using existing tried & true ones. He was game to try and we set about doing it. Our goals in this project were simple.
Having the rather
unrestricted goal in mind, we set out to find the perfect speaker design
online. |
 |
|
|
|
||
|
Dayton
DIY
|
||
 |
First
up were the very reccomended Dayton speakers from http://www.partsexpress.com
Parts Express mainly sells parts but have come up with designs for their
own line of drivers, the Dayton. Someone even dedicated a site to designs
he made with their drivers! We were then bent on trying out the Dayton
III due to its low price. Its so cheap we can almost squeeze enough speakers
into the budget for a home theater! When we tried ordering online but
to our astonishment, the shipping cost for a pair of 6.5" midrange
and tweeters came up to US$100+! This was too much considering that the
project was supposed to be around $4-500. Beaten but not down, we searched
on. |
|
|
|
||
|
Lynn
Olsen's Ariel
|
||
|
Next, we checked out Lynn Olsen's Ariel. It has one of the best reputation online and have gone through many variations to improve the sound further. They are easy to drive and reviews were most favorable. Unfortunately the enclosure design was a major PITA. Although our enthusiasm was immense, we lacked highly in the woodworking department. If the Ariel enclosures
were to be built by a professional carpenter, it'll look good, sound
great but probably cost us more than $1000 a pair. This idea was thrown
out as well. |
 |
|
|
|
||
|
Proac
Response 2.5?
|
||
 |
Finally
we chanced upon a very simple design found at http://www.geocities.com/diyproac25/
It claims to be a 2 way ported floor standing loudspeaker design that closely models after an acclaimed British commercial design. I have only heard lower range models from the same manufacturer and found them to give enjoyable vocals without obvious faults in the other departments. The parts for this design is available locally via http://www.leda.com.sg and we generously estimated the budget to not exceed $1500. $500 off target but I felt the results would justify the additional money. So friend got his
arm twisted till he agreed. I am that persuasive *grin* |
|
|
|
||
|
Loudspeaker
Design
|
||
|
Crossover
I chose the modified crossover design as the results push the frequency response closer to the original. There is also a series crossover that has yet to be published on the main site. The series one will definitely improve transparency but it might change the colouration which the originals are famous for. This choice was made totally independant of the fact that the speakers were up and running for months before I got wind of the series version. No, really :) I had deliberated between housing the crossover inside the enclosure in its own separate portion, sticking the crossover box right behind the enclosure where the binding post would be, hence reducing the number of cable runs needed or simple leaving it external with 'jumper wires' between the crossover and actual speaker. The result was a normal looking enclosure that you cannot directly connect to the amp with the crossover parts snugly fitted outside away from the harmful vibrations. This vibrations-affect-sound theory was never really proven but those who do reccomends it and friend didn't mind additional boxes outside his speakers. Probably because it made the speaker looks more exclusive and Alas friend wasn't ready to accept my proposition of making one speaker with the crossover within and the other without. Phooey. Funding people always gets in the way of science for the sake of aesthetics. Grrr Since crossover
is external, i can change it anytime i want without meddling with the
insides of the enclosures. |
 |
|
|
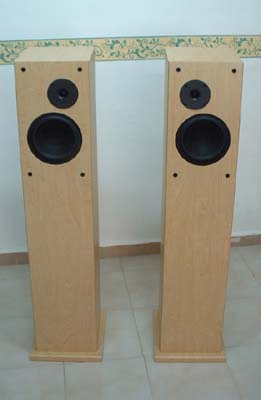
Enclosure
Designing was easy. Finding someone to make them for us was the sticky part. We wanted to get a friend who has 'lobang' for wood working facilities to do up the boxes for us cheaply. He was too busy so we, or rather cheapskate I decide to wait it out, as it'll save us some money. In the end the wait was too long and we ended up with an audiophile carpenter a friend recommended. He did a great job, helping us find & fix 3” diameter ports. He could also do a professional looking grill cover! |
||
|
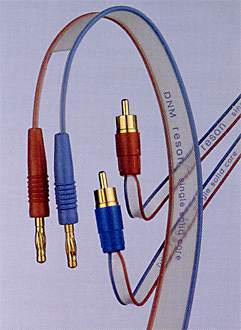
Wiring
They are very similar
to my own OCOS cables which are already great with my Dynaudio bookshelves!
I wanted to glue this flat cable to the side of the walls but we ended
up suspending it in the dampening material. |
 |
|
|
Dampening Material
|
||
|
Shopping
Friend ordered almost everything from Leda. Drivers, crossover parts, binding post cups and spikes. He chose 12ga copper foil inductors to be used in the woofer crossover and normal air core wire wound ones for the rest. This turned out to be a wise choice later on. We tried finding 1" long screws that would fit the drivers' screw holes. It turns out they were 1mm smaller in diameter than the conventional screws hardware stores sell. We later bought some 1/2" screws from Leda. I donated speaker foam gaskets and helped him buy the plastic boxes for crossover from Sim Lim Tower. |
||
|
|
||
|
Assembly
|
||
|
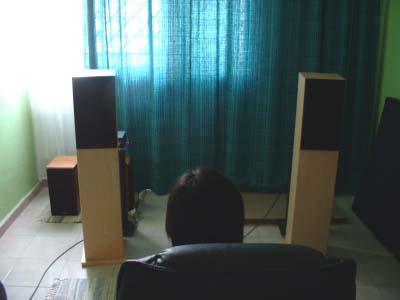
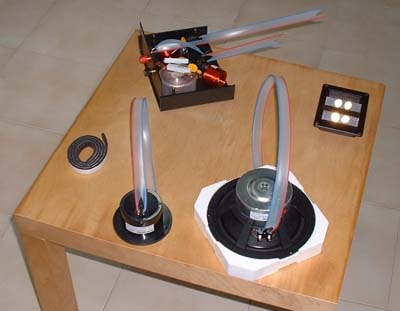
I apologise for the lack of detail in the content of the pictures, as I was alone when assembling the speakers and one pair of hands can only either solder or take pictures! Crossover was soldered on painstakingly ensuring short runs and that the inductors are not parallel to one another. Speaker wire was soldered on with the least amount of solder and I made sure the joints aren't weak. I screwed the drivers in by hand After receiving the enclosures, I completed the pair in just one weekend. After building & tested one speaker, I excitedly plugged it in and crossed fingers. On CD player, on amp. No sound. I quickly pulled out the cables and had a visual check. Nothing wrong leh!!! Brought in my meter and checked again. Correct what!!! What the fish is wrong!? Demoralised, I plugged in the speaker and tried again. Hey, sound. Hey not distorted. Hey good sounding! The strange thing was it happened to both speakers! Can anyone tell me why this happened? Issit due to bad soldering? Brand new unconditioned crossover? Anyhoo, they worked and boy did they sound good! |
||
|
|
||
|
The
Sound
|
||
|
I only have initial impressions as friend did not want me spend too much time working by helping him burn in the speakers first. So my negative findings might not exist in conditioned speakers. First thing I notice was that you can hear and feel more information on the low bass. This was comparing with my own speakers, which had a similar sized woofer but in an 11-litre box. So the sound seem to simply get better when as the enclosures get bigger. Don't be fooled by those slim floorstanders that uses 2 5" woofers and aren't Transmission Lines. Scanspeak 7" midrange in 37litre box beats more expensive 6.5" Dynaudio in 11litre! Vocals were very enjoyable, though they seem coloured. Classical works were as big as they get. They sounded as big and imposing as the music allows like my Danish beauties. As for power requirements, they aren't really 'tube friendly'. You'll need a hefty 50 tube watts to make 'em sing. Friend thought they sounded more constricted and less open on his 60wpc Rotel integrated compared to my 85watt 'generally warm sounding' solid state Class AB amp. So I reccomend either a VERY good 50wpc ss amp or 100w should be the minimum. Sound staging and imaging were not very good but this is probably due to them being brand new and not yet burned in. The originals are known to reproduce spatial information very well. Transparency was not in the same level as my Dynaudio speakers. Overall I liked
them a lot judging from sound alone though they aren't very resolving,
transparent nor image much. Of course I hope to either make a pair myself
in the future or get to audition them again to prove this wrong. |
|
|
|
|
||
|
Cost
Breakdown
|
||
| Item |
Qty
|
Cost*
|
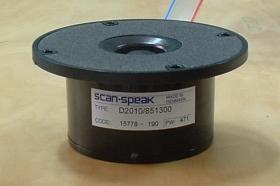
| Scan Speak D2010/8513 Silk Dome Tweeter |
2
|
$
192
|
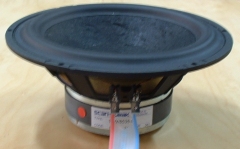
| Scan Speak 18W/8535 Carbon Paper Midrange Woofer |
2
|
$
440
|
| Crossover parts |
-
|
$
180
|
| Custom 1" MDF Cabinets with Veneer finish |
2
|
$
500
|
| Binding Posts |
2
|
$
024
|
| Floor Spikes |
8
|
$
020
|
| DNM Reson Speaker Cable |
3m
|
$
045
|
| Dacron Dampening Material |
-
|
$
050
|
| Total |
$1451
|
|